澜子我终于重回博客界了,虽然说在协会开设课程中关于Tensorflow的部分已经完全PU JIE,但是(划重点),本篇博客里还是有满满的干货滴。
本篇博客涉及到的几个重要的API分别是:tf.estimator, tf.feature_column, tf.data, tf.metrics, tf.image。
本篇的主要内容就是融合了上述中高阶API,基于MNIST数据集,实现最基本的分类问题,让我们一起愉快滴SAY HELLO TO DEEP LEARNING
先看看一些参考资料
- 先甩出 Tensorflow官网的API文档
- 再甩出 tf.estimator官方教程
- 澜子前期关于 tf.data 和 tf.metrics 的教程
- 本篇博客的所有代码都已经传到 澜子的github 啦,欢迎follow和star啊喂
- 强烈建议大家点开看一下,因为是用jupyter notebook,所以每一个代码块都有对应的输出,还有我自己写的一些注释,应该还是很好理解的
先大致看一眼澜子github上的readme
代码结构
1 | |--tensorflow_estimator_learn |
data_csv
data_csv文件中存放了MNSIT原始csv文件,分为验证、训练、测试三个部分
images
images文件中存放了jupyter notebook中所涉及的一些图片
tmp
tmp 文件中存放了一些临时代码
CNNClassifier.jpynb
未采用tf.dataAPI的自定义estimator实现
CNNClassifier_dataset.jpynb
采用tf.dataAPI的自定义estimator实现
CNN_raw.jpynb
未采用高阶API的 搭建CNN实现MNIST分类
DNNClassifier.jpynb
未采用tf.dataAPI的预制sestimator实现
DNNClassifier_dataset.jpynb
采用tf.dataAPI的预制estimator实现
简单瞅瞅estimator的地位
tf.estimator是TensorFlow里封装性很好的高级API,之所以要用tf.estimator,是因为运用高级API可以很好地减少我们的代码量。当然也可能因为高级API的高封装性带来一些使用上的不灵活性。

我们具体要怎么用呢
让我们一起来看图说话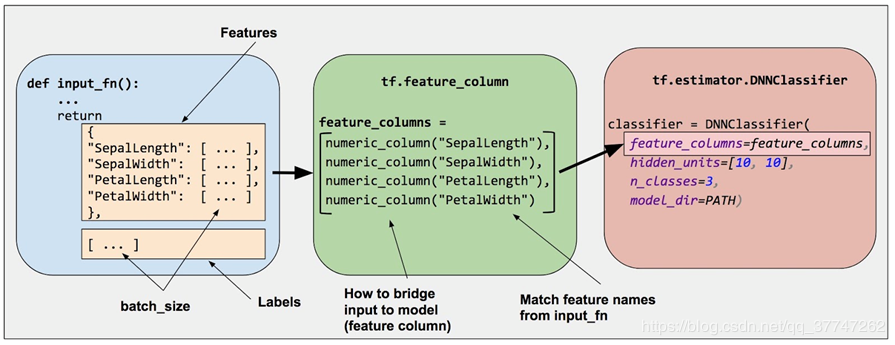
- 创建数据集输入函数 input_fn
- 定义特征列 tf.feature_column
- 实例化estimator tf.estimator.DNNClassifier
- 训练 / 验证 / 测试 model.train()/eval()/test()
需要注意的地方
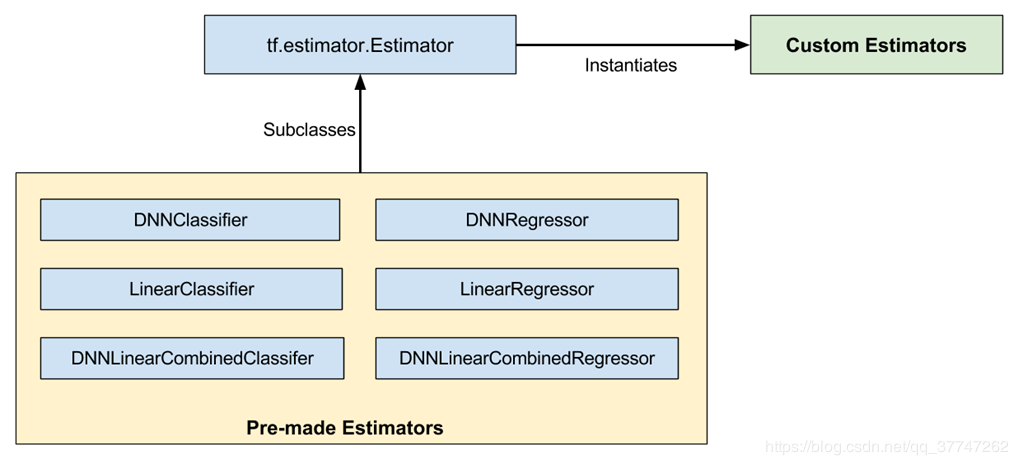
- 本篇博客没有采用图中所示的 Pre-made estimators 而是采用了自定义的 Custom Estimators,不同点在于是否需要定义自己的 model_fn
- 关于 Pre-made estimators的用法,我也放在了github上,大噶也可以去看看。
简单瞅一眼数据流
下面的图表直接显示了本次MNIST例子的数据流向,共有2个卷积层,每一层卷积之后采用最大池化进行下采样(图中并未画出),最后接2个全连接层,实现对MNIST数据集的分类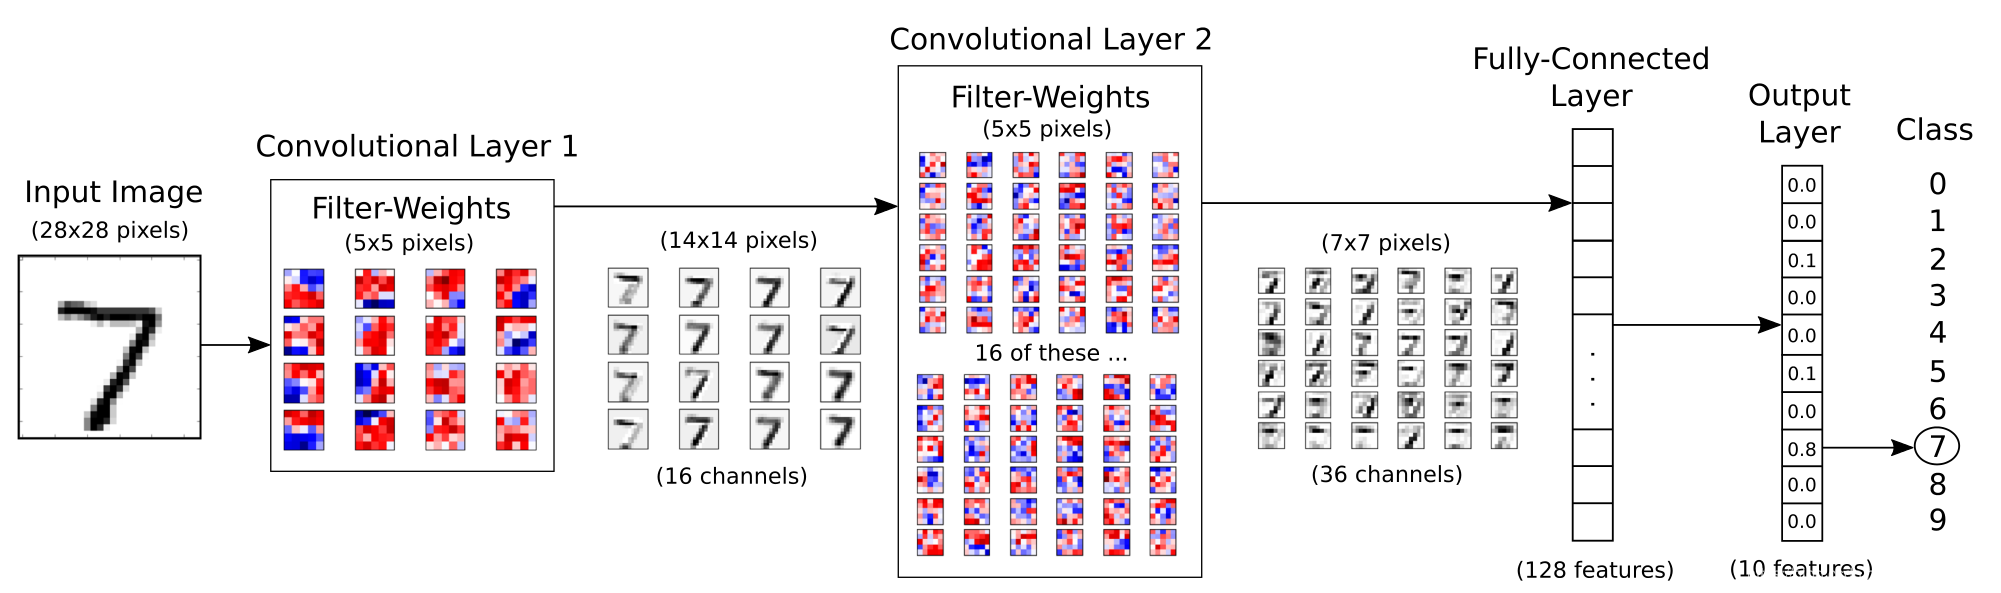
不说闲话了,CODE走起
STEP 0:前期准备工作
导入各种库
1
2
3
4
5
6
7
8
9
10
11%matplotlib inline
import tensorflow as tf
import matplotlib.pyplot as plt
import numpy as np
import pandas as pd
import multiprocessing
from tensorflow import data
from tensorflow.python.feature_column import feature_column
tf.__version__导入MNIST数据集及基本参数定义
1
2
3
4
5
6
7
8
9
10
11
12
13
14
15
16
17
18
19
20
21
22
23
24
25
26
27
28
29
30
31
32
33
34
35TRAIN_DATA_FILES_PATTERN = 'data_csv/mnist_train.csv'
VAL_DATA_FILES_PATTERN = 'data_csv/mnist_val.csv'
TEST_DATA_FILES_PATTERN = 'data_csv/mnist_test.csv'
MULTI_THREADING = True
RESUME_TRAINING = False
NUM_CLASS = 10
IMG_SHAPE = [28,28]
IMG_WIDTH = 28
IMG_HEIGHT = 28
IMG_FLAT = 784
NUM_CHANNEL = 1
BATCH_SIZE = 128
NUM_TRAIN = 55000
NUM_VAL = 5000
NUM_TEST = 10000
train_data = pd.read_csv(TRAIN_DATA_FILES_PATTERN, header=None)
test_data = pd.read_csv(TEST_DATA_FILES_PATTERN, header=None)
val_data = pd.read_csv(VAL_DATA_FILES_PATTERN, header=None)
train_values = train_data.values
train_data = train_values[:,1:]/255.0
train_label = train_values[:,0:1].squeeze()
val_values = val_data.values
val_data = val_values[:,1:]/255.0
val_label = val_values[:,0:1].squeeze()
test_values = test_data.values
test_data = test_values[:,1:]/255.0
test_label = test_values[:,0:1].squeeze()
STEP 1:创建数据集输入函数 input_fn
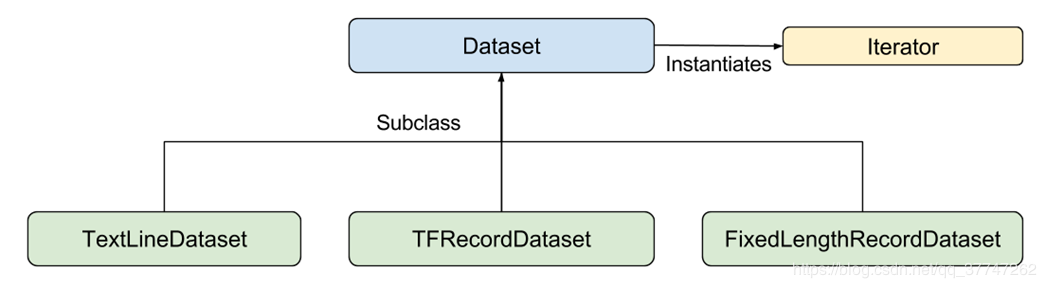
- 输入函数根据需要以任何方式生成features字典和label列表。官方建议使用Tensorflow的Dataset API
- 甩一张dataset的图瞅瞅
1
2
3
4
5
6
7
8
9
10
11
12
13
14
15
16
17
18
19
20
21
22
23
24
25
26
27
28
29
30
31
32
33
34
35
36
37
38
39
40
41
42
43
44
45
46
47
48
49
50
51
52
53
54
55
56
57
58
59
60
61# validate tf.data.TextLineDataset() using make_one_shot_iterator()
def decode_line(line):
# Decode the csv_line to tensor.
record_defaults = [[1.0] for col in range(785)]
items = tf.decode_csv(line, record_defaults)
features = items[1:785]
label = items[0]
features = tf.cast(features, tf.float32)
features = tf.reshape(features,[28,28,1])
features = tf.image.flip_left_right(features)
# print('features_aug',features_aug)
label = tf.cast(label, tf.int64)
# label = tf.one_hot(label,num_class)
return features,label
def csv_input_fn(files_name_pattern, mode=tf.estimator.ModeKeys.TRAIN,
skip_header_lines=1,
num_epochs=None,
batch_size=128):
shuffle = True if mode == tf.estimator.ModeKeys.TRAIN else False
num_threads = multiprocessing.cpu_count() if MULTI_THREADING else 1
print("")
print("* data input_fn:")
print("================")
print("Input file(s): {}".format(files_name_pattern))
print("Batch size: {}".format(batch_size))
print("Epoch Count: {}".format(num_epochs))
print("Mode: {}".format(mode))
print("Thread Count: {}".format(num_threads))
print("Shuffle: {}".format(shuffle))
print("================")
print("")
file_names = tf.matching_files(files_name_pattern)
dataset = data.TextLineDataset(filenames=file_names).skip(1)
# dataset = tf.data.TextLineDataset(filenames).skip(1)
print("DATASET",dataset)
# Use `Dataset.map()` to build a pair of a feature dictionary and a label
# tensor for each example.
dataset = dataset.map(decode_line)
print("DATASET_1",dataset)
dataset = dataset.shuffle(buffer_size=10000)
print("DATASET_2",dataset)
dataset = dataset.batch(32)
print("DATASET_3",dataset)
dataset = dataset.repeat(num_epochs)
print("DATASET_4",dataset)
iterator = dataset.make_one_shot_iterator()
# `features` is a dictionary in which each value is a batch of values for
# that feature; `labels` is a batch of labels.
features, labels = iterator.get_next()
features = {'images':features}
return features,labels
注意
- 在函数
decode_line(line)中的features = tf.image.flip_left_right(features),即应用tf.image完成了对CSV文件中解析得到的张量数据的增广操作,当然,你还可以根据需要运用tf.image增加不同的数据增广的操作。 - 推荐使用tfrecord格式的数据,虽然本篇博客没有用,但是tfrecord确实可以大大加快TensorFlow数据处理的速度。
STEP 2:定义feature_column
关于feature_column,大家可以去官网看看文档,有好几种类型的feature_column,我们需要根据数据的不同格式,定义不同的feature_column,本篇博客只用到了数值型的feature_column.1
2feature_x = tf.feature_column.numeric_column('images', shape=IMG_SHAPE)
feature_columns = [feature_x]
重头戏之model_fn
正如前文所展示的数据流,我们希望搭建一个含有两个卷积层和两个全连接层的卷积神经网络,而预制的estimator无法实现我们的需求,所以我们需要自己定义对应的model_fn,从而达到我们的预期,代码如下。1
2
3
4
5
6
7
8
9
10
11
12
13
14
15
16
17
18
19
20
21
22
23
24
25
26
27
28
29
30
31
32
33
34
35
36
37
38
39
40
41
42
43
44
45
46
47
48
49
50
51
52
53
54
55
56
57
58
59
60
61
62
63
64
65
66
67
68
69
70
71
72
73
74
75
76
77
78
79
80
81
82
83
84
85
86
87
88
89
90
91
92
93
94
95
96def model_fn(features, labels, mode, params):
# Args:
#
# features: This is the x-arg from the input_fn.
# labels: This is the y-arg from the input_fn,
# see e.g. train_input_fn for these two.
# mode: Either TRAIN, EVAL, or PREDICT
# params: User-defined hyper-parameters, e.g. learning-rate.
# Reference to the tensor named "x" in the input-function.
# x = features["images"]
x = tf.feature_column.input_layer(features, params['feature_columns'])
# The convolutional layers expect 4-rank tensors
# but x is a 2-rank tensor, so reshape it.
net = tf.reshape(x, [-1, IMG_HEIGHT, IMG_WIDTH, NUM_CHANNEL])
# First convolutional layer.
net = tf.layers.conv2d(inputs=net, name='layer_conv1',
filters=16, kernel_size=5,
padding='same', activation=tf.nn.relu)
net = tf.layers.max_pooling2d(inputs=net, pool_size=2, strides=2)
# Second convolutional layer.
net = tf.layers.conv2d(inputs=net, name='layer_conv2',
filters=36, kernel_size=5,
padding='same', activation=tf.nn.relu)
net = tf.layers.max_pooling2d(inputs=net, pool_size=2, strides=2)
# Flatten to a 2-rank tensor.
net = tf.contrib.layers.flatten(net)
# Eventually this should be replaced with:
# net = tf.layers.flatten(net)
# First fully-connected / dense layer.
# This uses the ReLU activation function.
net = tf.layers.dense(inputs=net, name='layer_fc1',
units=128, activation=tf.nn.relu)
# Second fully-connected / dense layer.
# This is the last layer so it does not use an activation function.
net = tf.layers.dense(inputs=net, name='layer_fc2',
units=10)
# Logits output of the neural network.
logits = net
# Softmax output of the neural network.
y_pred = tf.nn.softmax(logits=logits)
# Classification output of the neural network.
y_pred_cls = tf.argmax(y_pred, axis=1)
if mode == tf.estimator.ModeKeys.PREDICT:
# If the estimator is supposed to be in prediction-mode
# then use the predicted class-number that is output by
# the neural network. Optimization etc. is not needed.
spec = tf.estimator.EstimatorSpec(mode=mode,
predictions=y_pred_cls)
else:
# Otherwise the estimator is supposed to be in either
# training or evaluation-mode. Note that the loss-function
# is also required in Evaluation mode.
# Define the loss-function to be optimized, by first
# calculating the cross-entropy between the output of
# the neural network and the true labels for the input data.
# This gives the cross-entropy for each image in the batch.
cross_entropy = tf.nn.sparse_softmax_cross_entropy_with_logits(labels=labels,
logits=logits)
# Reduce the cross-entropy batch-tensor to a single number
# which can be used in optimization of the neural network.
loss = tf.reduce_mean(cross_entropy)
# Define the optimizer for improving the neural network.
optimizer = tf.train.AdamOptimizer(learning_rate=params["learning_rate"])
# Get the TensorFlow op for doing a single optimization step.
train_op = optimizer.minimize(
loss=loss, global_step=tf.train.get_global_step())
# Define the evaluation metrics,
# in this case the classification accuracy.
metrics = \
{
"accuracy": tf.metrics.accuracy(labels, y_pred_cls)
}
# Wrap all of this in an EstimatorSpec.
spec = tf.estimator.EstimatorSpec(
mode=mode,
loss=loss,
train_op=train_op,
eval_metric_ops=metrics)
return spec
注意
- model_fn的定义有固定的标准,包括其对应的输入参数以及返回参数
- model_fn定义了模型的网络结构,损失函数,优化函数及评估参数等一系列指标,大家根据可以根据自身需求相应的增删
STEP 3:实例化Estimator
- params部分可以进行个性化配置
- model_fn 即是刚刚我们定义的model_fn
- model_dir 是我们的模型和log的保存路径
1
2
3
4
5
6params = {"learning_rate": 1e-4,
'feature_columns': feature_columns}
model = tf.estimator.Estimator(model_fn=model_fn,
params=params,
model_dir="./cnn_classifer_dataset/")
STEP 4:激动人心的训练/验证/测试来啦
在第四部分,我们只需要简单调用train,evaluate,predict 方法,就可以实现对模型的训练、验证和测试啦
愉快训练吧
1 | input_fn = lambda: csv_input_fn(\ |
验证一下看看
1 | input_fn = lambda: csv_input_fn(files_name_pattern= VAL_DATA_FILES_PATTERN,mode=tf.estimator.ModeKeys.EVAL) |
最终测试测试
1 | import itertools |
终于是要写完了,时隔多月,再次复出,呕心沥血之作。当然,遇到什么问题,记得留言告诉我哈,如果我没有回复你,说明我不会,23333。